Sunday, November 29, 2009

Missing a part of my heart


**ALERT** No card updates, just sad news and sappy reminiscing. If you only visit for paper crafting updates, you can skip this post.


I have been dreading an update to the blog due to the way our Vegas trip ended. The Vegas trip was so nice and VERY RELAXING. It was wonderful not having to rush around completing tasks like a chicken with my head cut off, but the vacation ended poorly. We weren't supposed to get into Houston until 10pm Monday night. Starting Saturday night the little voice in my head, which I call God, was telling me over and over and over we needed to get home early Monday so we could pick up the fur babies from boarding one day early. I did all I could to get us on that plane early Monday morning. Plane landed, we headed straight for boarding center to pick up the fur babies. All was well until several hours after we arrived home. Kona started hiding under the bed, which he NEVER does. He is usually in the same room with us being playful and loving on us. This was not the case. We started watching him. He became lethargic then close to 10 pm, he started howling and crying in pain when we were loving on him. We rushed him to the Emergency clinic to find out he had Arterial Thromboembolism. Basically blood clot killed him after causing deep pain paralysis, hence the howling caused by the pain. We didn't get home until 3am. While researching this disease, I found this is something that doesn't show signs or any kind of warning and 95% of the time they pass within 24 - 48 hours.

Despite the lack of sleep, I forced myself go to work Tuesday. I just couldn’t lie around and cry. It hurt too much and I felt like I was going to die from the pain and grief. I was practically non-functional. I really believe these babies are our family and in some cases, closer than regular family.

I now know why God was telling me to go home early. I never would have forgiven myself if we received a call that morning letting us know he was already gone. God sent us home so that Kona would have his loving parents with him in has last hours.

I want to have a memory layout dedicated to him, but it’s still too early in the grieving process. I realized I am scheduling way too many things than I am capable of completing to occupy my time and keep from thinking about what happened. You know how you keep yourself so busy, you don’t have time to stop and grieve. When I try to work on a memory page for him, I just bust out in tears. Kona was such a “Larger Than Life Personality” his absence has created a big black hole. The absence of the energy he exuded is certainly noticed. The other fur babies have noticed too. Jasmine, Kona’s girlfriend, is not herself and it just makes it worse to see the other fur babies suffering the loss. Sorry to be so long winded. I’m going to share some pics of our pesky, comical, loving and crazy Kona. The baby I am holding in my arms for the “About Me” picture is Kona. He would love for me to sing to him softly while holding him like a baby. Mike snapped this photo during one those sappy sessions.

Be blessed and love your babies. They are such a huge part of our heart and family, it just doesn't seem right to call them pets.


Saturday, October 31, 2009

"O" Happy Halloween!!!


We have run away to Vegas and are having a BLAST!! Halloween Night is all about finally seeing the underwater performance of "O" by Cirque du Soleil. In 1994 "Mystere" was the first time I laid eyes upon this phenomenal show and I became a huge fan. I am not sure why, but the dynamic kaleidoscope of sights and sounds always evoke powerful emotions in me. If you get the chance to see any of their shows, as they do travel around the world, don't miss the chance. You will be amazed!

Have a Safe, Happy and Fun Halloween!

Cheers,

Tuesday, October 20, 2009

Warm Healing Wishes


It seems as though the summer has flown by, but believe it or not, it is already time to start gearing up for the flu and pneumonia season. What better way to send healing thoughts to a friend than with this little Tea Pocket. It's sure to brighten the recipient's day and speed their recovery. Be prepared and make up a bunch to have on hand.

I designed and created the Tea Pocket with all Stampin' Up! Supplies and my beloved Big Shot. If you would like to purchase your Stampin' Up! supplies from me, visit my website HERE.

*Sizzix die Petal Card #113467
*Sizzlit Lots Of Tags # 114508
*Cold & Cuddly # 116523
*Curvy Verses #114948
*Dasher # 116816 inked antlers only with White Craft Ink
*Snowflakes from Snow Swirled #111690
*Dazzling Diamonds on the edge of the iceberg
*1/2" Striped Grosgrain Ribbon in Bashful Blue # 110717
*Brocade Blue & Bashful Blue paper and ink used

*~~click on the images for a larger view~~*


Monday, October 12, 2009

Pumpkin Treat Holders


Whipped up some kits for a gathering of paper crafting friends this past weekend. I added Dove Peanut Butter Chocolates and Lindor Truffles in Halloween colors. I included a quick write up with the supplies and dimensions in case you want to make a few. I don't have time for a detailed tutorial. My templates and designs are shared for free.

All Stampin' Up! Supplies:
Ovals die Item #114525 The biggest oval in the set
Heart to Heart punch Item #113694 for eyes.
Small oval punch Item# 107304 for tall pumpkin mouth his nose drawn with black marker
Large oval punch Item# 107305 for short wide pumpkin mouth.
Word Window punch Item# 105090 for stems. 1 punch cut in 1/2 and decorated with marker
Swirls & Scribbles Sizzlit die Item# 113441 for vines
Merry Details Stampin Up sizzlit die in Mini Holiday catalog for black crow
Pumpkin Pie marker for the grooves
Old Olive marker to add shading to swirly vines
Chocolate Chip to draw on stem punched from Word Window
Dauber in Pumpkin Pie ink pad for shading outside edge of pumpkins
Signo white gel pen for embellishing crow, pumpkin eyes and mouth
~~~ CLICK ON PICTURE OF MINI TEMPLATE TO ENLARGE~~~

Strip of 4" x 2-1/2" Pumpkin Pie cardstock for each pumpkin. Use template as a guide for scoring. Cut grey triangle notches and throw away.Glue notched edges to decorated oval pieces. Add candy and give away. ;-)

There are so many ways to decorate these little treat containers. Have fun!!

Monday, September 28, 2009

Stinky Pinky


I felt like using the adorable little skunk from Pun Fun (Item # 115054) again and used my flower template I shared originally in this post. *FLOWER TEMPLATE*

All Stampin' Up! Supplies

Stamped and embossed with Iridescent Ice the flourish from Stampin' Up! Priceless set (Item #115052) on the pink card base. Butterfly is made from punched out Stampin' Up! Trio Flower punch (Item# 109183) and cut off one petal and decorate butterfly with White Unibal Signo Gel pen . Sponged sky with dauber and Bashful Blue ink. All coloring is done with Stampin' Up! Watercolor Pencils. Carefully cut him out and pop dotted him. Added white bow and pierced holes around the flower scene to make it stand out.

I am happy to share my Flower template if you want to make your own. Just leave a comment or email me and I'll send it to you.

That's all for now. Super busy deciding what to take to work on this weekend for a Stamper's Retreat!! Will be baking an award winning Key Lime pie and Down Home South bars for snackies!! ;-)

Wednesday, September 23, 2009

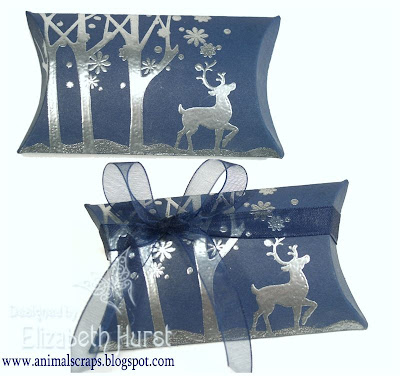
Night Of Navy Holiday Trio


Just playing around with my Stampin' Up! Sizzix dies trying to figure out which container would be the easiest to make if I needed something in a pinch. The altered Baskets & Blooms was my favorite to make.

Pillow Box die(item # 113466).

Petal Card die for the square box(#113467). Need four petal cards to make a 2-1/2" square gift box.

Baskets & Blooms die (item# 113484) I altered the Baskets & Blooms by using a 9" x 3-1/2" strip of paper. Scored in 3/8" from each side of the 3-1/2". Then along the long 9" side, scored at 3" & 6". Snipped a little triangle at the intersections on both sides. Finished basket is 2-1/2" deep X 4" wide.

Before assembling the boxes/baskets, I stamped with Versamark and embossed with silver embossing powder.

ALL STAMPIN' UP! products: Snow Swirled, Winter Post, Lovely As A Tree, Trees Three (retired), Cardstock is Night Of Navy.

The Baskets & Blooms basket would be gorgeous with a handful of fine chocolate wrapped in silver, wouldn't it?! What would you put in the basket??

Sunday, September 20, 2009

Biscuits, Cards & Trash


Hubby used our new oven to make homemade biscuits. His first attempt I might add and he made them with a heart shaped cookie cutter. How sweet is that?!


One of my favorite new sets from Stampin' Up! is the Chic Boutique set. I had this set with me Friday night when I met up with my card making buddies. One of the ladies placed little gift bags at each seat with goodies and embellishments for us. I was inspired by the colors of the felt flowers and the store had some paper that coordinated with the embellishments.

I used the flourish frame from the set to decorate the corners of the focal panel. I stamped twice and then used Stampin' Up! Watercolor Pencils to color the flourish. Struggled for a bit knowing I wanted to add another color, but wasn’t sure which one. Then I spied a piece of teal paper in the trashcan, so I pulled it out, gave it a scallop edge and added it to the card. Très Chic, don’t you think?


I created a vintage style Christmas card with my new Dasher stamp from Stampin' Up! Used Versa-Mark on the horns and Close To Cocoa on his body. Huffed, stamped and sprinkled Gold embossing powder on his horns. French Script background stamp to add interest to the background and snowflakes in the corners. Sponge dauber to shade the edges of the focal panel. Stampin' Up! Petals-A-Plenty for a embossed poinsettia effect. Ribbon treatment and pop dot focal and the card is complete. This is a really quick and easy card.


If you would like to purchase your Stampin' Up! supplies from me, visit my website HERE.
*~~click on the images for a larger view~~*

Wednesday, September 9, 2009

Tall Tree Trimmings


I have another holiday card to share that was made in last months card classes. I used Baroque Motifs to create a fancy garland to suspend the lovely ornaments from the Tree Trimmings set. Heard From The Heart set for the sentiment and used the scallop border punch to layer strips of card stock that coordinate with the ornament colors.


Supplies are Stampin' Up! and if you would like to place an order with me, visit my website HERE.

Go create something beautiful!!

Tuesday, September 8, 2009

Card Inspiration


I wanted to share some cards I made recently for friends and classes I am teaching. Thought you might like a little inspiration since I have been too busy to share lately. Stay tuned as I am working on some mini-tutorials to share on my blog as well.

*********************TULIP THANKS *********************

All Stampin' Up! supplies were used to create these cards. I wanted a decorative border for the sentiment used on the tulip card, so I altered a piece punched from the Curly Label Punch (item # 112966). Cut it in half and then snipped the sides off to frame the sentiment on Very Vanilla punched from the Small Oval punch (item # 107304).


*******************CARDINAL CHRISTMAS *******************

The Cardinal Christmas card would be a nice card for reproducing to send out for the holidays. All you need is a lovely strip of Design Paper to show off the beautiful cardinal image. The cardinal image (item # 111760) is stamped on Very Vanilla card stock. I used my Stampin Pastels to shade the edge of the scalloped oval and pierced each scallop to punch it up a bit.

As always, these cards are available for donations that benefit animal shelters.

Have you started working on your Christmas cards?? Would love to see what you are creating. Link me to your latest creations.

Happy Stamping!

Sunday, August 2, 2009

Hang In There & New Oven


I finally have a post to let you know what I have been up to. I'm super busy with several projects. One including researching a new oven for the home. Ours went kaput while broiling steaks for dinner earlier this week. We had to finish them in a toaster oven in three batches. We got a good laugh out of it. I love to bake and cook, so it's imperative that we have a working oven. I think the decision is for a glass top convection oven. It's capable of baking 100 cookies at once. Heart swoon...... This will cut holiday baking down by several hours. I'm so excited!! Not to mention the fact that the store is offering Zero % interest and no payments for one full year. I love that option and have purchased most of our big appliances this way. The new oven has started a frenzy of new ideas for holiday goodies. One of my frequently fought over holiday goodies is Almond Toffee. Last year I found these felt buckets that had snowflakes embroidered on the front and I snagged several at $1 each. I used them as packaging for my Christmas Toffee. Aren't they cute!

I know, I know...get on with the card info. ;-) This is one of the cards the ladies wanted me to include in the July card class. They LOVED it!! It's such a cheerful card, how could you not?


Used Stampin'Up! (SU) Eyelet Border punch for the decorative edge on the purple paper. Stampin' Up! (SU) Top Note die with watercolor paper and SU markers to color the Penny Black image. Sponged clouds in SU Bashful Blue around the image. SU Sizzlits Little Leaves die for the leaves I tucked in around the layered flowers from SU Boho Blossoms punch. Printed the sentiment on my computer and punched out with SU oval punches. Used the paper piercer and mat pack to add interest to the sentiment oval.

This card is available for those wishing to donate to animal shelters by purchasing a set of my hand made cards. I will be back this week with some more cards! Please join me in my mission.

Thursday, July 30, 2009

Watermelon Template In Action


I wanted to share a fantastically sweet creation by Caroline (aka Caz) of stampingcaz.blogspot.com. She used my Watermelon template from this post (LINK), but made some slight changes. Caroline changed the handle to act as a support for the delicate flower Tilda is holding. Then she filled the basket with stamps from Stampin' Up! Tart N Tangy set and lots of ribbons. What a great gift this would be for a seasoned stamper or a beginner. I love seeing what others have created using my templates. Please continue to share. Have a wonderful day and be happy! ;-)

Saturday, July 18, 2009

Winter Post Medallion


Shame on me. I have other commitments and orders I need to work on, but my mind is in overload with ideas, so I created a winter card after I finished posting the Rich Razzleberry Wedding card. Same technique, just different theme. The Medallion stamp can be used as a snowflake or wreath. I created a little ice skating scene with Winter Post set (item # 111780) and Lovely As A Tree (item # 115026). Added Dazzling Diamonds to the tree branches, ground and edge of ice pond. Cut out the ice skating couple and pop-dotted. Inside flap uses snowflakes and sentiment from Snow Swirled set (item # 111690). Organza ribbon tops it off. All supplies are Stampin' Up! and if you would like to place an order with me, visit my website HERE.

Friday, July 17, 2009

Rich Razzleberry Wedding


The Design Team Challenge this week on Late Night Stampers is to design a card that is ANYTHING but the regular size. I have always been a shaped card designer, so this was not a problem. All supplies are Stampin' Up! and if you would like to place an order with me, visit my website HERE.

I am in love with the new In Color Rich Razzleberry (RR), so I let that wonderful color be my guide.


Used the new Stampin' Up! Medallion (item# 115223) stamp inked with Whisper White Craft Ink. Stamped on a folded piece of RR. Cut around the Medallion shape. Cut out the middle circle of the Medallion to use later on another card. ;-) Cut two circles for the inside of the card. Used 2-Way Glue Pen (item # 100425) to add Dazzling Diamonds (item # 102023) to the veil and bodice of the image from the To Have & To Hold set(item #115098.)

The front of the card opens up to reveal the complete Bride & Groom image from the To Have & To Hold stamp set. Placed one circle on the bottom piece of card stock. I then took the circle that has the water colored Bride & Groom and scored the top and adhered just the top scored portion of the circle to the bottom circle, so it flips up to reveal the stamped sentiment in the pretty border that comes with the set. I like using a blender pen with ink to highlight the sentiment border and make it really pop. The flap allows the sender to write their own greeting, yet makes for a unique card. Final touch included adding SU Organza ribbon (item # 441319) to the top of card.

That's all for now. Have a super weekend!

Sunday, July 12, 2009

Watermelon Gift Bag

**UPDATE** Be sure to include an email if you don't have a blogger profile with your email displayed. If you haven't received your template, you may email me at the email listed on my blogger profile page.


Another template share!! I designed and created this tote for the June Secret Stamper gift using the little skunk from the Pun Fun set. If you would like my template and instructions, leave me a comment and I'll send it over. The sentiment frame is from the Great Friend set and I cut it in half. I added Jelly Belly Watermelon jelly beans and the lotion is Bath Junkie Watermelon scent along with a bag of sour patch gummy watermelon chews. It is too hot to mail chocolates in Houston, so I opted for candy. I wanted something for the "stinky" in the sentiment...that would be the Watermelon scented lotion and something to represent the "sweet" from the sentiment...that would be the candy.


Another option would be to add some home baked cookies. Aren't these watermelon cookies ADORABLE!!! I converted my template and instructions into PDF form. If you would like a copy, leave me a comment and I'll send it over by email.


Want to make your own cookies? Meaghan shows you how here with her awesome step by step instructions.

All content included on my site is COPYRIGHT © Elizabeth Hurst. Original artwork is shared for your inspiration and may not be used for publication, submissions, or design contests. Be considerate and do not take credit for my designs or ideas.